With the exception of the old 1995 Gundam W Sandrock I completed back in July, I've only worked on SD kits up until now (the whole story of my interest in SD Gundam can be read in my About section). While I still have a small handful of SD sets on the backburner, I decided to finally move forward with what really interests me - the Master Grade scale. MG strikes the right balance for me between size, detail, and availability of model.
While I have a few other MG kits in my closet waiting to be worked on, it seemed only fitting to start with the granddaddy - specifically the MG RX-78-02 Gundam The Origin. I found this to be an absolute joy to work on and decided to pull out all the stops, including many things I had never tried before. This is my "Kit of Many Firsts":
- First Master Grade
- First time pre-shading
- First time painting pilot figures
- First time working with clear paint
- First time applying waterslide decals
- First time weathering
- First time chipping / dry-brushing
- First time using an Action Base
All things considered, I'm absolutely thrilled with the results. There's virtually nothing I'm unhappy with, and at this point I can confidently say that I'm no longer a beginner.
- Fully Painted - Gaianotes lacquers for all airbrushing; Testors / Model Master enamels for hand-detailing
- Decals - purchased second-hand from eBay
- Weathering - Tamiya Weathering Master sets
- Chipping / Dry-Brushing - Mission Models acrylics and Tamiya Flat Aluminum
Detail of upper body. The eyes are the only aspect I'm not so thrilled with. This kit comes with two different eye pieces - one clear (in case you're using an LED) and one opaque. I started by doing a metallic yellow candy coat on the opaque piece, but decided I wanted the eyes to have more of a "lens" appearance like the weapon scopes. I went back and sprayed the clear eyepiece with clear yellow and the edges silver. However, it just doesn't reflect much light. I may ultimately decide to put the metallic yellow piece back in after all.
I enjoyed working with the Tamiya Weathering Master sets, and was able to get a lot of great effects using them. Between those and the aluminum dry-brushing, I'm very happy with the results. My favorite details are the chipping on the left side of the shield and the rusty stains dripping down at its bottom, where the red meets the white. I was aiming to tell a visual "story" with the weathering effects, and I think I succeeded. I purposefully weathered the bottom of the model more heavily than the top to imply the increased wear and tear that the feet and legs would be exposed to, thinking back to the Gundam's many battles on earth.
More detail shots. The inside of the shield was masked off to spray the light gray color. I was very careful with the hands, and happily did not have any joint breakage. I opted not to use the clear yellow blast effect parts (i.e. to slot into the two holes in the shoulder) as I'm not crazy about their appearance.
Amuro Ray sitting snug in his cockpit! I did some hand-detailing in and around the cockpit area to give the appearance of various monitors and viewscreens.
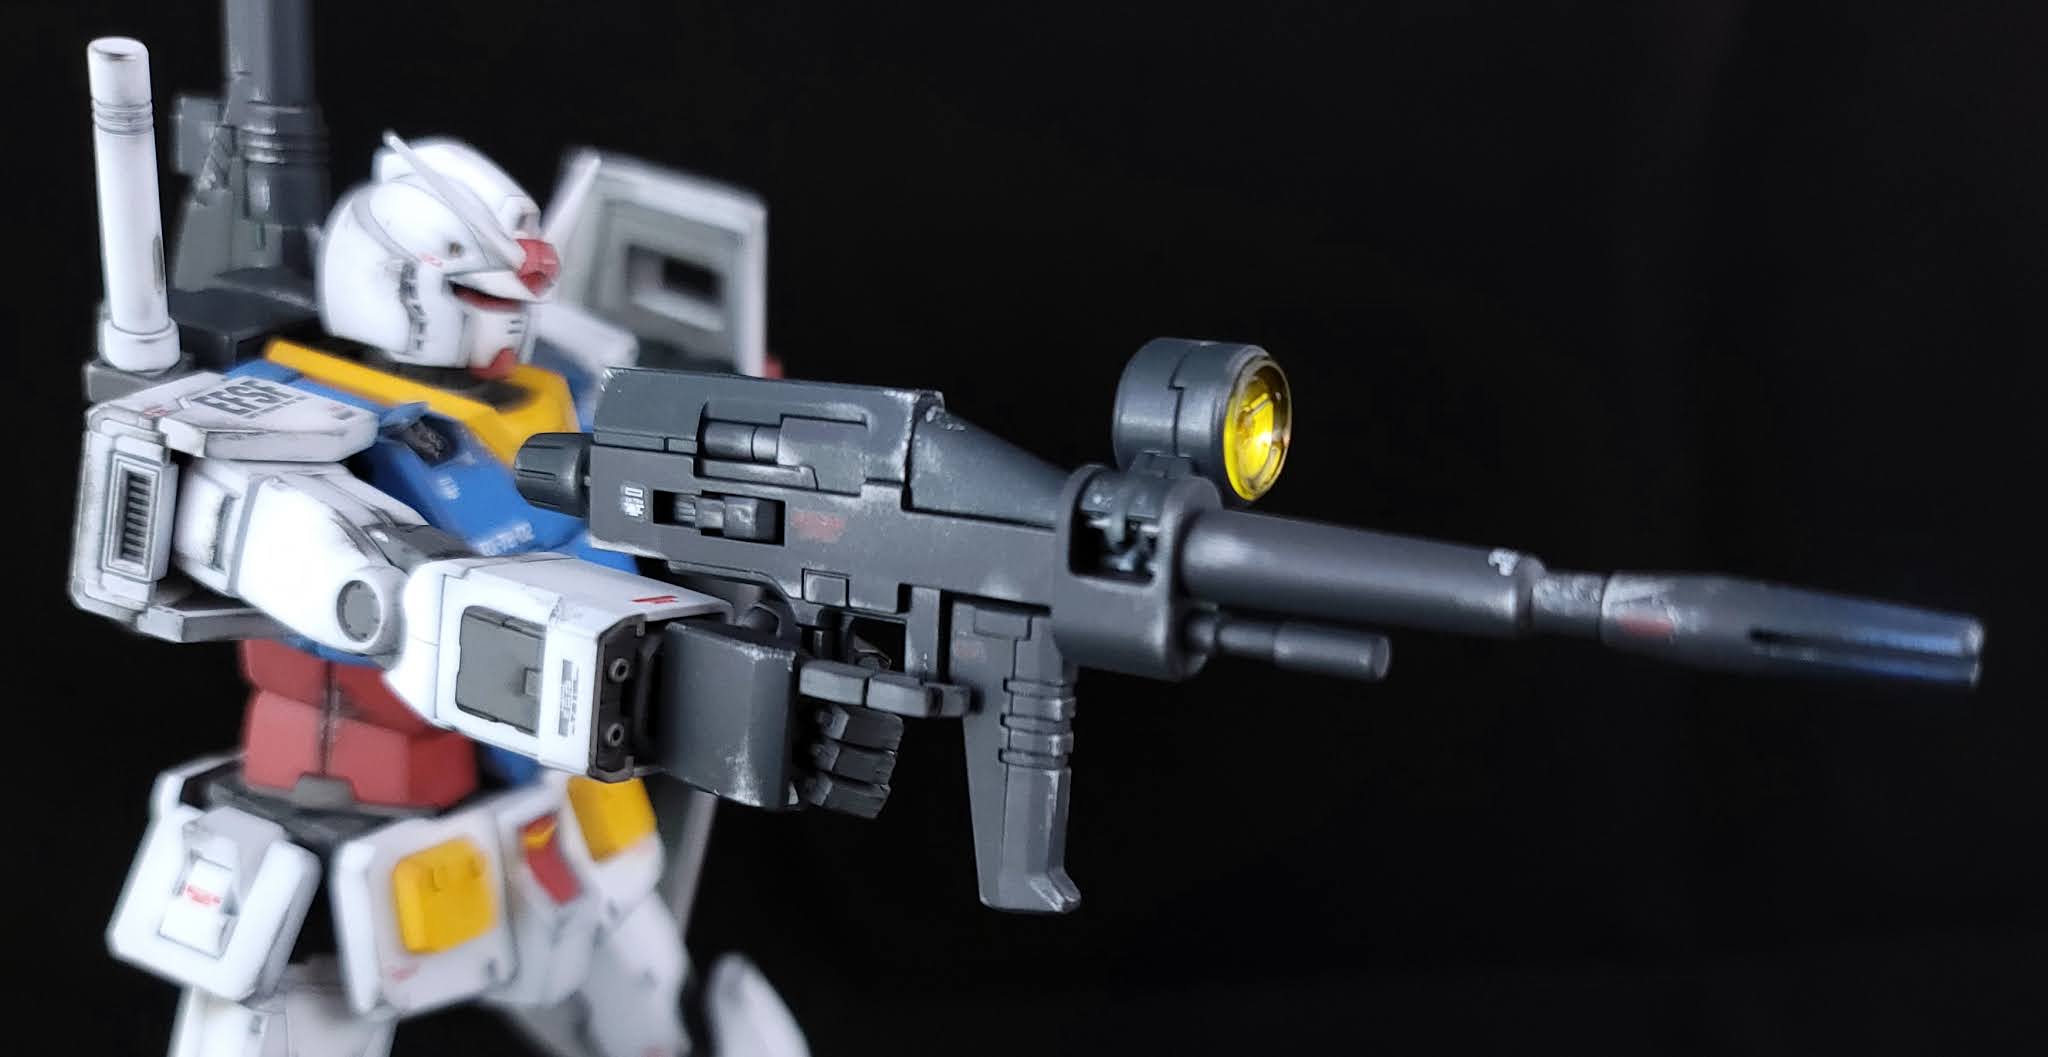
Posed shots featuring the Beam Rifle. For the weapons, I used both a dark neutral gray and a midnight blue to break up the sameness a bit. Like all the lenses on this kit, I sprayed the back of the lens with metallic silver, and the front with clear yellow. I applied some of the Tamiya Weathering Master Burnt Blue to the barrel, which gave it a nice scorched metal effect. Unlike the Gundam itself, there are no instructions for applying decals to the weapons, so I made my own decisions.
Posed shots with the new Origin-specific Beam Rifle. Using the Action Base was a little tricky at first, but I got the hang of it after a while. I looked at the box art and instruction manual for this and the subsequent poses. You can also see some of the details on the bottoms of the feet, which, when viewed up close, look like the Gundam is dancing a jig.
Posed shots with the Hyper Bazooka and Shoulder Cannon. The Bazooka took quite a while, but I think the details were worth it, including the metallic silver shells. I love that final picture, which gives a real sense of scale with Amuro taking a break as the Bazooka is reloaded.
Final poses shots with the trademark Beam Saber in action by itself. I used layers of clear white to build up the glowing effect at the base of the beam.
Full kit and all painted accessories.
A final shot with the beautiful box art. What a great first MG experience!


man .. this paint job is awesome .. great work!
ReplyDelete