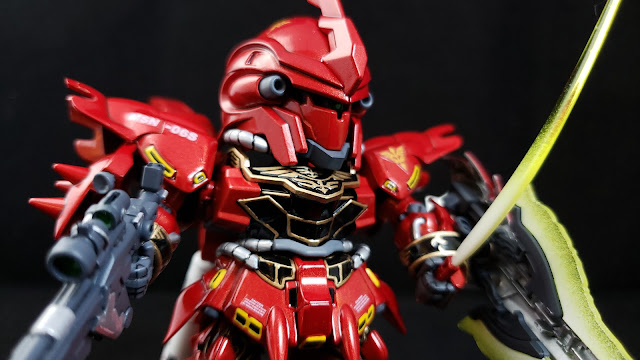
The legendary Sinanju was one of the first models I was drawn to when I decided to pick up the gunpla hobby. It's truly the Ferrari of mobile suits, with its sleek curved lines and chrome red paint job. Later, after watching its spectacular appearances in Mobile Suit Gundam Unicorn, I was even more enthralled. I looked at a ton of other builds, mostly of the MG Ver. Ka model, and decided I really wanted to push myself to make this little guy look just as luxurious as its bigger counterparts.
This was a difficult build for me - the parts were simple enough, but the details and painting were very time-consuming. So much so that by the time I was done, I had nearly finished two other kits that I was working on at the same time, one being the SD Unicorn Gundam.
This is a fully painted build, mostly using Testors enamels (and a little bit of Mission Models acrylics). I've since switched to lacquer paints for most of my airbrushing - if I were to redo this kit today, I would definitely use the candy coating technique (someday I'll likely get the MG and try this!). Still, I think I was able to achieve a pretty high-quality look with the straight metallic enamel paint (Testors Stop Light Red Metallic sprayed over white primer).
This SD kit is notoriously chunky and lacks articulation. Since it's very back-heavy it's difficult getting it into the right pose to stand up straight. Also note that the shield is very annoying to mount on the arm, especially with the beam effects attached, as I have in these shots. I ultimately decided to remove the spiked arm guard on that side so I could attach the shield more easily - not ideal, but a worthwhile trade-off I think since the shield is really the star of this design.
Some in-progress work on the infamously difficult shield, which I've heard some modelers describe as a right of passage. I believe that pulling off a paint job on the SD shield is likely harder than the larger models, as here it's all one piece. I attempted to use the reverse wash technique, though it was quite challenging since most of the gold detail lines on the shield (all but the emblem) are recessed, meaning it was almost impossible to cleanly get a hobby swab in the tight recesses to clean off the top layer of paint and reveal the gold underneath.
I had the idea to use the foil stickers as a mask. I very painstakingly cut out the thin gold trim from the stickers with my X-Acto knife and laid them on the areas I wanted to remain gold. This proved hit or miss - on some pieces it worked pretty well, but on others the stickers stuck to the shield and made a mess when I peeled them off. I also used a duplicate of the overall sticker (I bought two of these kits as I needed the spare parts after some un-fixable mistakes) to mask the finished inner sections so as to spray red around the edges.
The whole thing was very messy and I ended up having to touch it all up by hand anyway - almost all of the gold details, as well as the red edges, were done by hand in the end, in some cases they were even redone multiple times.
You can't see it, but I broke one of the thrusters during final assembly! I stupidly attached them upside-down and as I pulled them off to fix the positioning, one of the connecting pegs broke off inside the polycap. I'm happy to say I kept cool and simply re-fused it with some Tamiya Extra Thin cement. I let it sit overnight and then reattached the part into the socket the next day and it's been perfectly fine!
By far my most challenging kit to date, and also the most rewarding. Ultimately I think I did the Sinanju justice. After finishing with a nice smooth gloss coat (two actually, because I forgot to add the clear stickers the first time) and assembling, I can say without question that it's the star of my SD gunpla collection. Building this model made me feel like I hit the next level and solidified my desire to move onto larger kits.


Comments
Post a Comment